As we discussed in Part I of this series, AWS RDS is great for production, but unwieldy for dev, stage, and test databases. Businesses of all kinds ship faster with their entire DB load on Neon: Instant provisioning saves time, development is smoother with branching, and scale to zero reduces non-prod cost by 40%.
But if you’re already in production on RDS, migrating a live database is painful. You don’t need to move everything over to get the development velocity and cost efficiency of non-production databases on Neon. There’s an automated, low-risk way using a Neon Twin—a synchronized copy of your RDS dataset in Neon, that updates automatically every night using pg_dump/restore and GitHub Actions.
What is a Neon Twin?
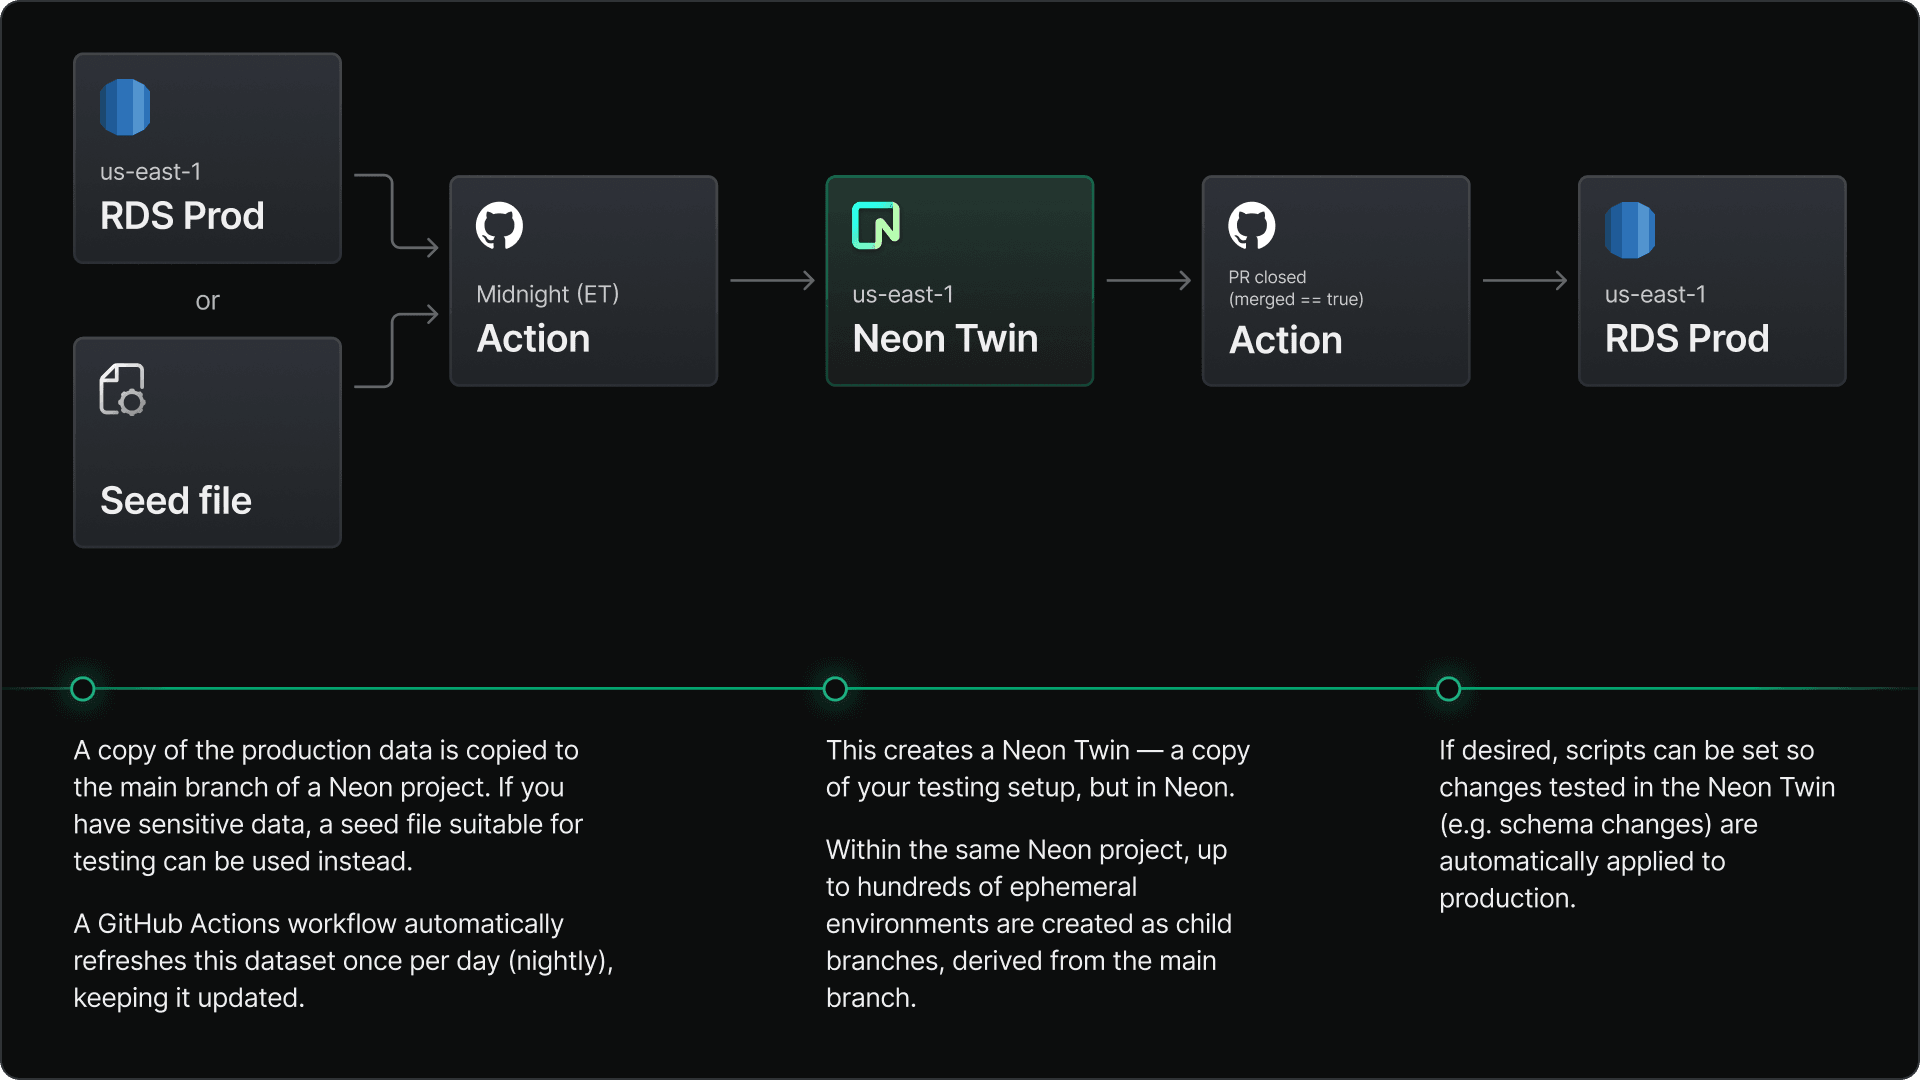
A Neon Twin is a synchronized copy of your RDS production database in Neon, created and maintained using a GitHub Action. This action automatically runs a nightly pg_dump of your RDS database and restores it to Neon, ensuring your development environment stays up-to-date.
With a Neon Twin in place, developers can quickly start building, testing, and taking advantage of Neon’s rapid development features, such as instant database provisioning, branching, and automated scaling, without disrupting the production or staging environments.
Prerequisites
Before diving in, there are several things you’ll need to know to build the pg_dump and restore workflow:
- RDS connection string
- AWS deployment region
- A Neon account
- A Neon database (deployed to the same AWS region as your RDS database)
- While not absolutely necessary, using the same AWS region can help reduce egress charges. Neon does not charge for ingress.
- GitHub repository access to Actions and Secrets
Quick start
All the code shown in this article can be found on this GitHub repo: create-neon-twin-default.yml
Known limitations
Job execution limits
As explained in the GitHub documentation, there are some usage limits on GitHub Actions. Specifically, job execution time is limited to 6 hours; if a job reaches this limit, the job is terminated and fails to complete.
This limit might be relevant for the dump/restore nightly job. How long this job takes to execute will depend on the size of your production database, the specifications of the EC2 and Neon instances, and the regions where both are deployed. For jobs that may run for longer than 6 hours, self-hosted runners can be used.To optimize execution times, we recommend using the same region for both the RDS instance and Neon Twin. A list of supported regions can be found in the Neon docs.
GitHub Actions IP addresses
If your production database isn’t configured for public access or is restricted to a set of IP addresses, you’ll need to provide all IP addresses that GitHub Actions use. The GitHub documentation explains that not all IP addresses are listed and that they change regularly. If access to your production data is restricted by IP address, you will experience connection issues with GitHub Actions.
For more details, check out the GitHub docs:
SSL certificates
If your production database connection requires an SSL certificate, you might find this blog post helpful, which demonstrates how to use Postgres SSL certificates in GitHub Actions.
Creating a Neon project to host your dev environment
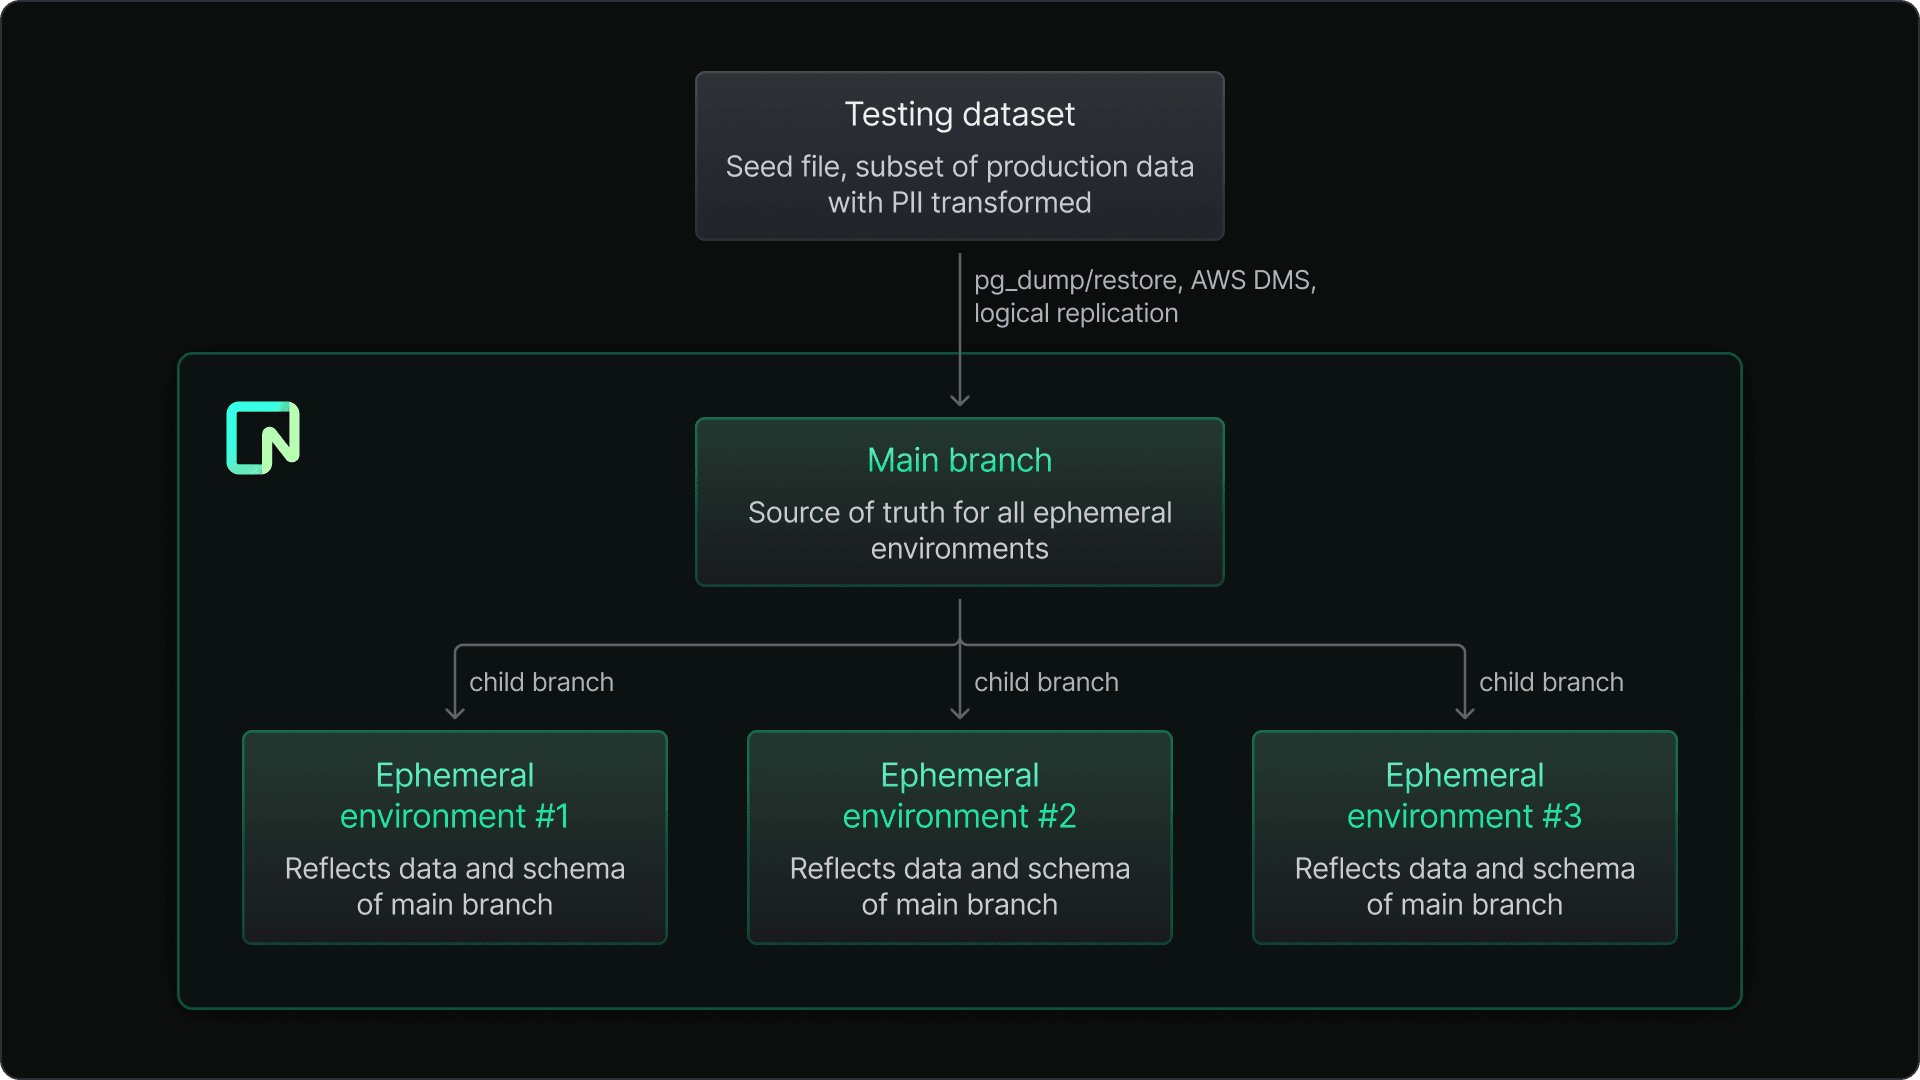
If you’re new to Neon, the first step is to sign up and follow our getting started guide to create your initial project. During the onboarding, you’ll be introduced to these key Neon terms:
- Project: The top-level container for your Neon databases—the logical equivalent to an “instance” in RDS.
- Branch: A versioned copy of your database environment. Each Neon project can have multiple branches, as we will see later.
- Database: The actual database instance where your data resides. In Neon, databases live inside branches.

Neon is built on an innovative branch-based architecture:
- The main branch will be your primary development branch, where you’ll load the data from your RDS database every night.
- Once everything is set up, you’ll be able to create additional branches from the main branch to duplicate your development environment in a second, without additional storage costs, as many times as you need. Every engineer on your team can have their own dev branch, facilitating parallel development without adding overheads in database management or costs.
Once you’ve set up your Neon account and your project, create a database in the main branch, and make a note of the connection string. You will need this in the next step.
Migrating data from RDS to Neon automatically: Using pg_dump/restore with GitHub Actions for nightly sync
Next, we’ll leverage GitHub Actions to automate the process of creating a Neon Twin. This involves running a nightly pg_dump of your RDS production database and restoring it to Neon.
Create the workflow file
First, create a new file named create-neon-twin.yml within the .github/workflows directory of your GitHub repository. Add the following code to this file:
name: Create Neon Twin (default)

on:
  schedule:
  - cron: '0 0 * * *' # Runs at midnight ET (us-east-1)
  workflow_dispatch:

env:
  PROD_DATABASE_URL: ${{ secrets.PROD_DATABASE_URL }} # Production or primary database
  DEV_DATABASE_URL: ${{ secrets.DEV_DATABASE_URL }} # Development database
  PG_VERSION: '16'

jobs:
  dump-and-restore:
    runs-on: ubuntu-latest

    steps:
      - name: Install PostgreSQL
        run: |
          sudo apt update
          yes '' | sudo /usr/share/postgresql-common/pgdg/apt.postgresql.org.sh
          sudo apt install -y postgresql-${{ env.PG_VERSION }}

      - name: Dump from RDS and Restore to Neon
        run: |
          /usr/lib/postgresql/${{ env.PG_VERSION }}/bin/pg_dump "${{ env.PROD_DATABASE_URL }}" -Fc -f "${{ github.workspace }}/prod-dump-file.dump"
          /usr/lib/postgresql/${{ env.PG_VERSION }}/bin/pg_restore -d "${{ env.DEV_DATABASE_URL }}" --clean --no-owner --no-acl --if-exists "${{ github.workspace }}/prod-dump-file.dump"
Understanding the workflow steps
The workflow above includes several key steps:
- cron: Defines when the workflow runs using POSIX cron syntax. In this example, it runs nightly at midnight (Eastern Time).
- workflow_dispatch: Allows manual triggering of the workflow during development.
- Environment variables:
PROD_DATABASE_URLandDEV_DATABASE_URLare stored as GitHub Secrets and are the connection strings for the production database and Neon Twin, respectively.PG_VERSIONspecifies the Postgres version to install. - Install Postgres: Installs the specified Postgres version using Apt (Advanced Packaging Tool) on the Ubuntu environment used by GitHub Actions.
- pg_dump: Creates a custom format dump file of the RDS production database.
-Fc: Indicates that the dump file is in custom format.-f: Specifies the name and file path for the temporary dump file.
- pg_restore: Restores the dump file to the Neon database.
--clean: Removes existing objects before restoring new ones.--if-exists: Avoids errors if objects to be dropped do not exist.--no-owner: Does not restore original ownership.--no-acl: Does not restore original permissions.-d: Restores into the database defined by DEV_DATABASE_URL.
Next, we’ll show you where to add the environment variables mentioned above, so that the GitHub Action can access them.
Adding environment variables to GitHub Secrets
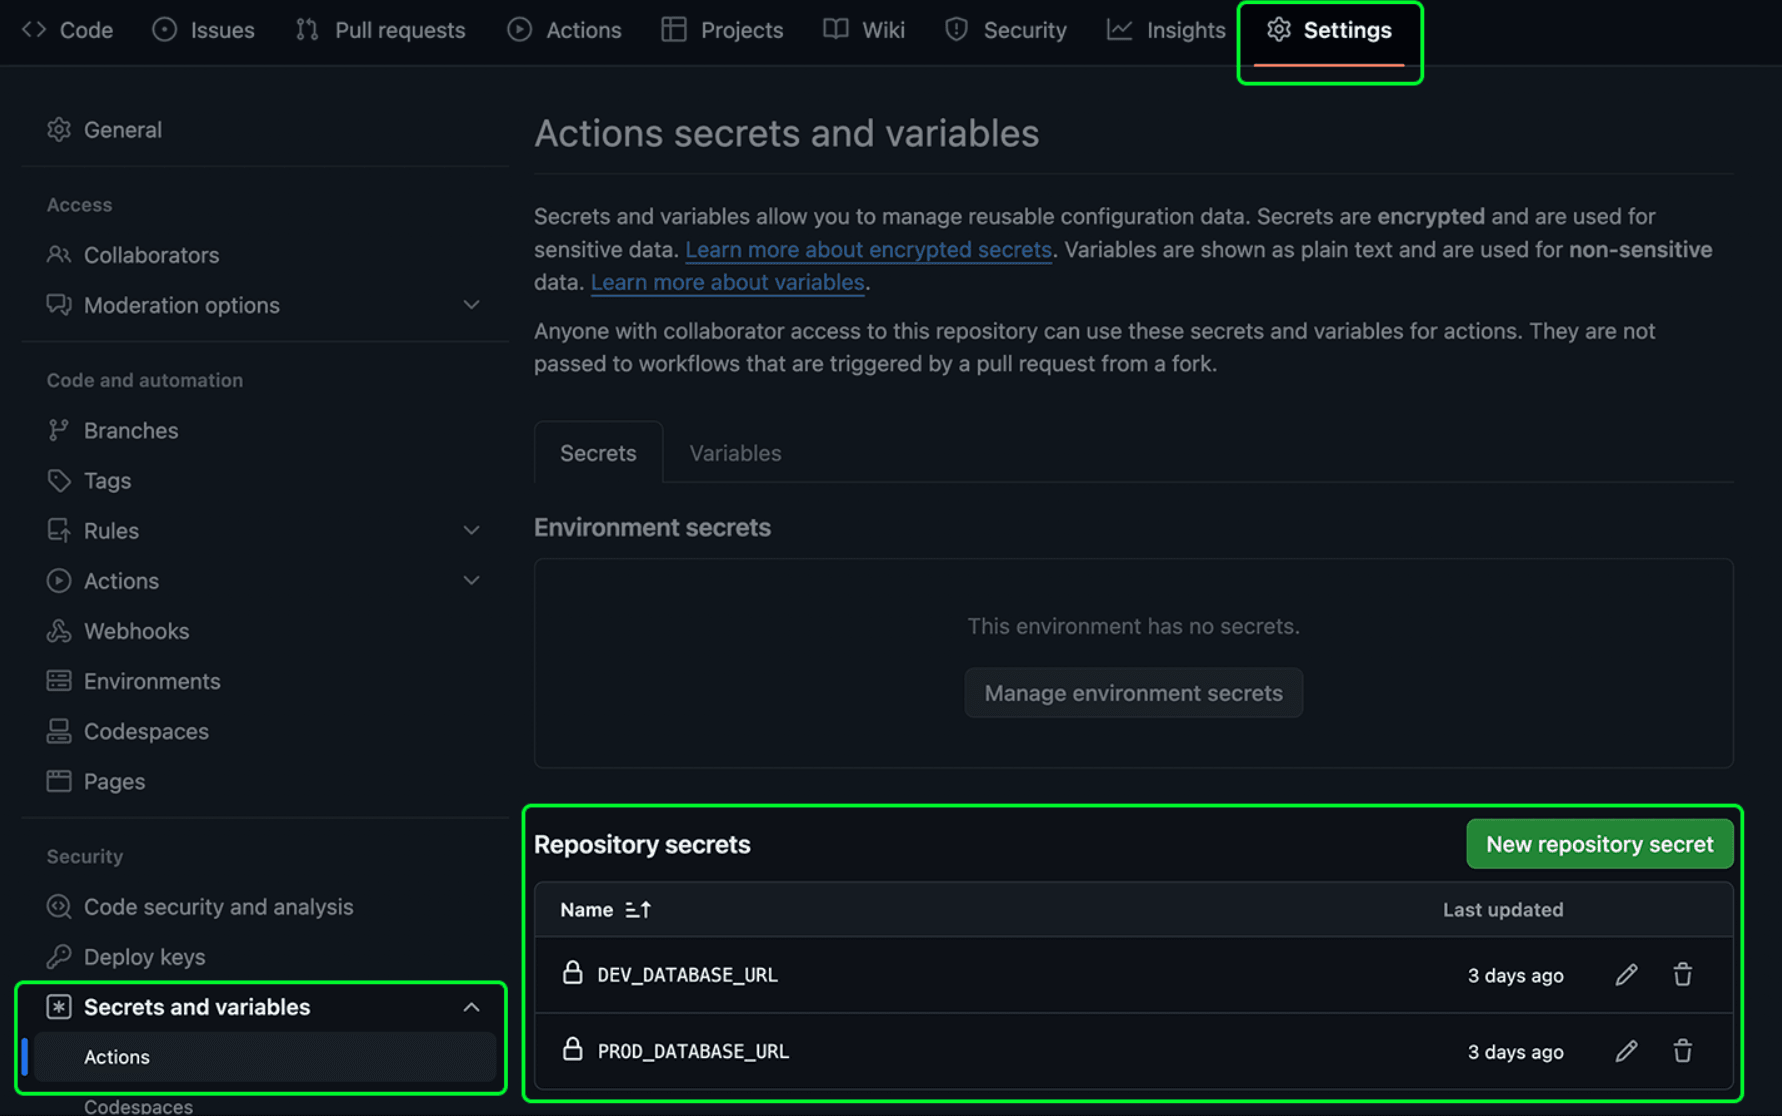
In your GitHub repository, navigate to Settings > Secrets and variables > Actions and add the connection strings for both PROD_DATABASE_URL, and DEV_DATABASE_URL under Repository secrets.
Run the workflow
Once you’ve committed the changes, pushed the code to your GitHub repository, and added the GitHub Secrets, you can trigger the workflow using the GitHub UI.
Navigate to Actions > Create Neon Twin > Run workflow and then click the Run workflow button.
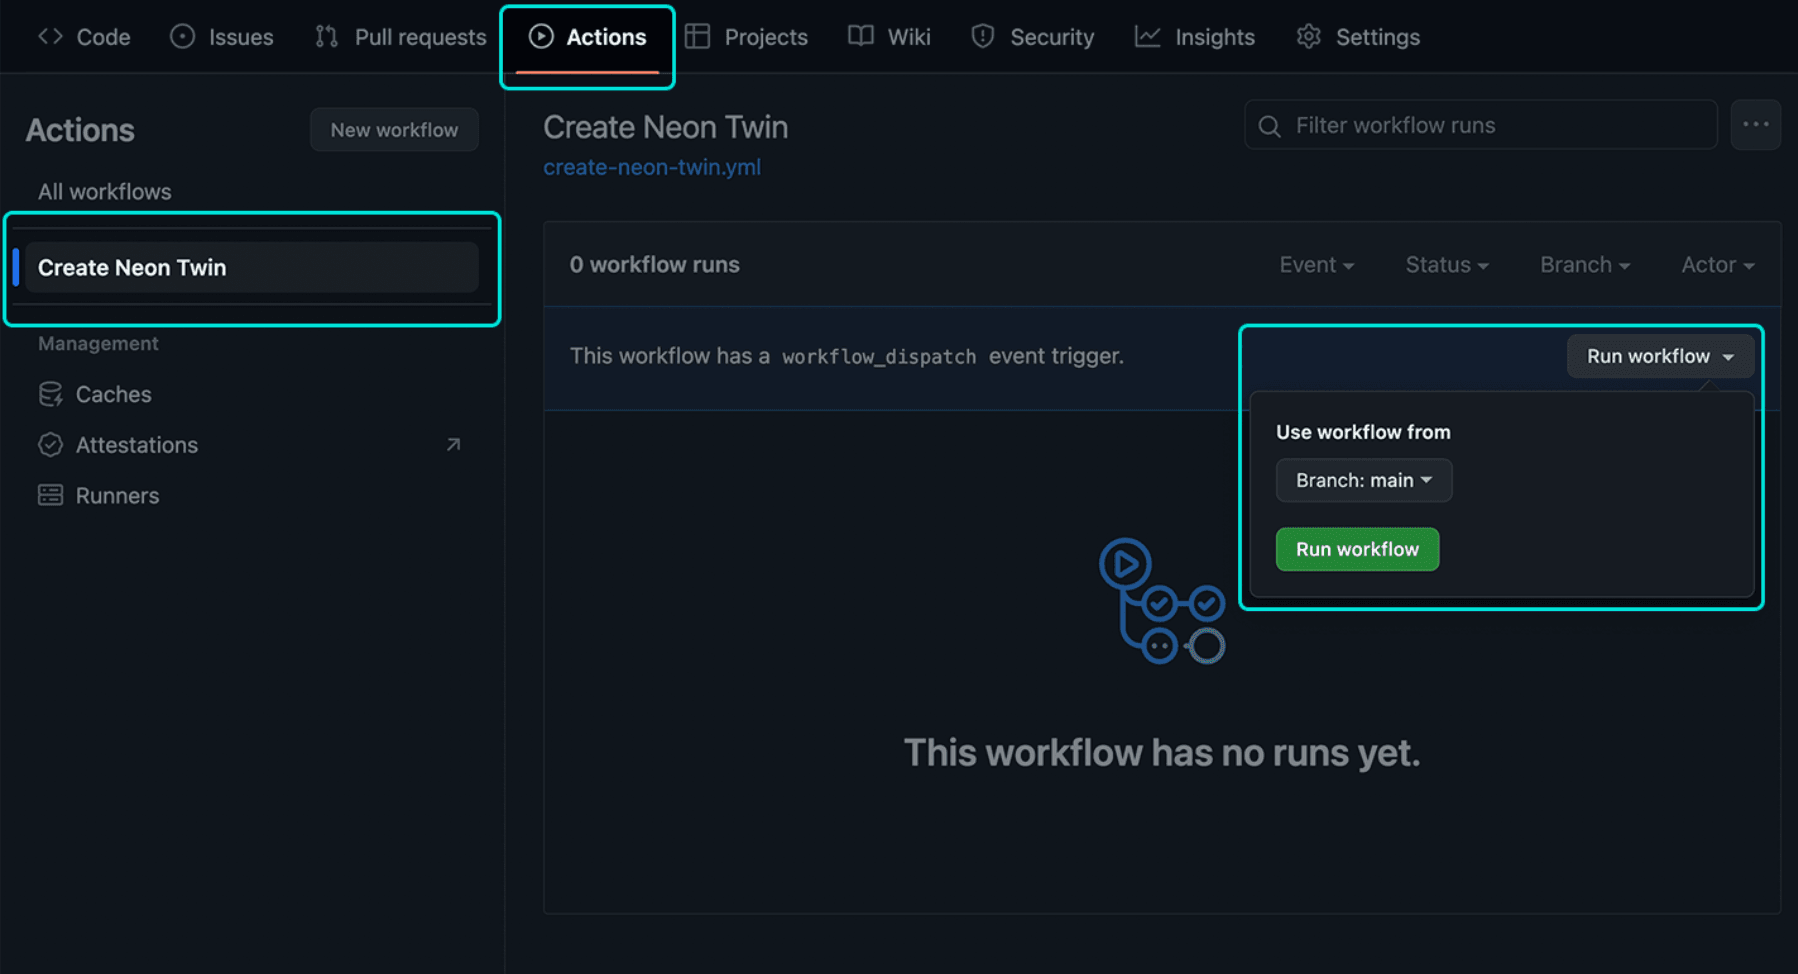
If the workflow completes without errors, your new Neon Twin will be ready for use!
To check if everything went well, head over to the Neon console and go to Tables in the left-hand sidebar. If you see the same table schema and data as your RDS database, the pg_dump/restore operation was successful.
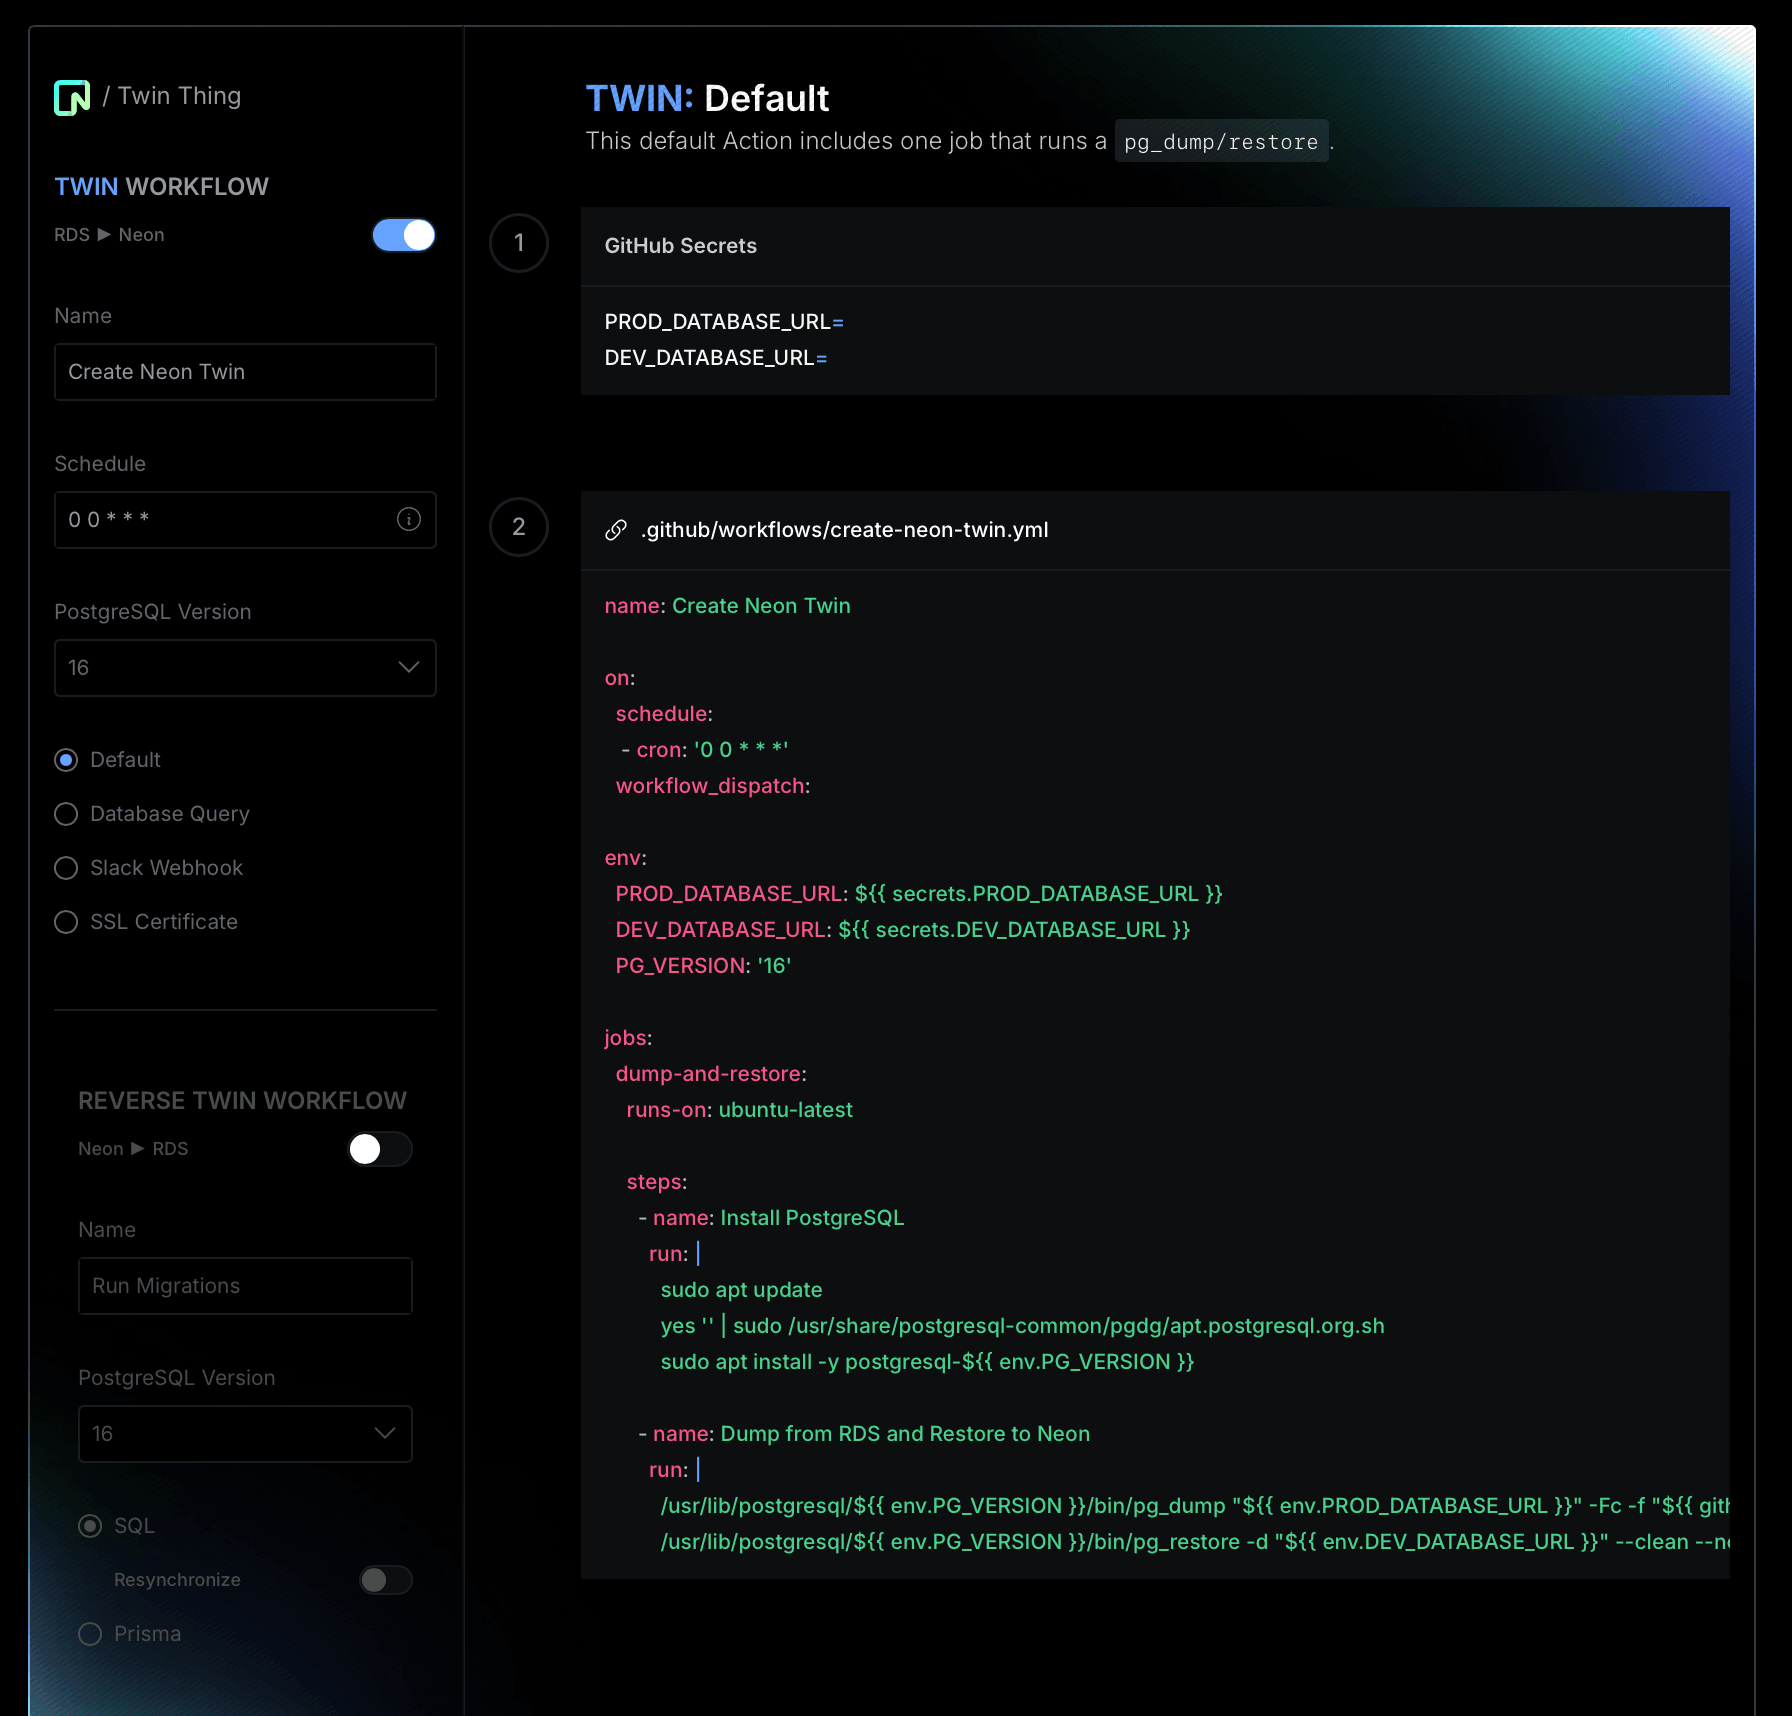
Use the Twin Thing app to build your workflow
We’ve built a tool specifically designed to assist with the creation of Github Actions. We’re calling it Twin Thing. Check it out.
Wrapping up
In this blog post, we walked you through the process of optimizing your development environments by creating a Neon Twin of your RDS database using GitHub Actions. Here’s a quick recap of what we covered so far:
- In Part I, we discussed how setting up a synchronized copy of your RDS database in Neon (a Neon Twin) can streamline your development workflows.
- We discussed how to set up the essential components required for the process of setting up a dev environment in Neon.
- We automated the process of moving data from RDS to Neon via a nightly pg_dump triggered by Github Actions.
Next steps
Continue building the workflow: Move on to Part III to add Slack alerts to monitor the status of your dumps / restores, and learn how to deploy a change tested on Neon back to prod in RDS in Part IV.


